

Creating Maps in ArtWorks 2
Article by Steve Fryatt
When I took on the job of creating the publicity materials for WROCC’s annual Wakefied Show, one of the tasks was to create the road map used on the adverts, website and exhibitor packs. Since the capable ArtWorks 2 – from Martin Würthner – had been used in previous years, I decided to stick with this.
There are a number of ways to achieve a street map effect in Draw or ArtWorks, but the easiest is to use a series of overlaid lines with reducing thickness. The lowest line provides the edges of the road, the next draws the main body over that, and – if required – the top one adds a central reservation to a motorway or dual carriageway.
Fortunately, in my case the club already had a suitable map which was very close to the required design, meaning that the hard work of creating the cartography had already been done for me. Despite that, during the process I learned a few things about the way that ArtWorks handles lines and shapes, many of which have far wider uses.
The technique described should also work in Draw, but it may be necessary to use a third-party tool such as Kell Gatherer’s StreetMap utility to ease some of the process.
Laying out the map
The first stage of the process is to draw out the roads on the map using simple lines. The lines themselves need to be the correct width for the class of road, and it is a good idea to work out at the start what these will be. The first lines to be drawn need to be the overall width of the outsides of the edge lines; in the examples here, I will be working with 2pt borders, so the base lines will need to be 4pt more than the width of the central part of the road. In practice, this gave widths of 17pt, 12pt, 8pt and 6pt working down from motorways to the smallest roads.
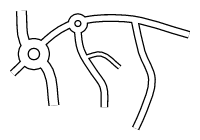
Where two or more roads join, it is simply a case of making sure that the two lines overlap with none of the background showing. The order in which the lines are stacked does make a difference later on in the process, but it is easier to take care of this at that point. Roundabouts are best left as simple junctions at this stage (figure 1).
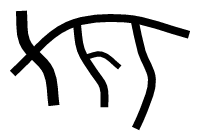
Adding roundabouts
With the basic layout done, it is possible to start adding roundabouts to the map. They are simply drawn as unfilled circles with the same thickness as the major roads that they are linked to, but care needs to be taken to ensure that the roads leading into them terminate neatly.
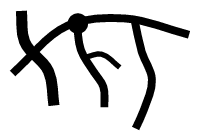
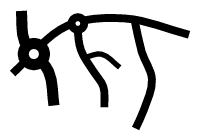
The first step is to add the roundabout over the required location (figure 2). Then pick one of the road lines that run through it, and select it (figure 3a). Switch to the path tool, and place a new point on the line just inside the roundabout edge by clicking Select (figure 3b), then break the line at this point using the split tool in the info bar (or Backspace) as shown in figure 3c. It is now possible to select the remaining line (remember that holding down left Alt temporarily enables the select tool) and then repeat the process (figure 3d).

With the line now split at both sides of the roundabout, select the central section and delete it to leave the arrangement shown in figure 3e. Finally, use the same process on the remaining line, to give a finished roundabout shape. With a little practice, the process becomes very quick to carry out, since ArtWorks ensures that the control points of the two halves of a split line are always set correctly.
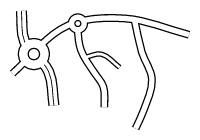
With the process complete for all the roundabouts on the map, we get the arrangement shown in figure 4.
Giving the roads borders...
Now that the roads are all laid out, we can start to fill in the centres. This is done by cloning the lines and circles, using narrower lines of a different colour to give the effect of the two borders.
Start to select roads and roundabouts of the same line width, then copy them (Ctrl-C) and paste then back into the same place (Shift-Ctrl-V). Leaving the copies selected, change the line width to 4pt less than the original, and alter the line colour. figure 5 shows the 17pt motorway lines treated in this way; the white lines are 13pt wide.
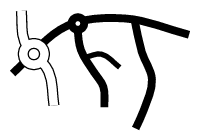
figure 6 shows this effect applied to the whole map.
...and a central reservation
The final stage is to add the central reservation to the motorway. This is done in the same way as the previous stage, but this time the cloned line is the same colour as the road border and is only 1pt wide (figure 7). The reservation needs a little tidying where it runs into the roundabout: this can be achieved either by pulling the top circle of the roundabout to the front or, perhaps preferably, by trimming the reservation lines back using a similar technique to that shown in figure 3.

Finishing touches
The completed road layout is shown in figure 8. At this stage, it is possible to start adding additional details such as colouring the various types of road (eg. blue for motorways, green for trunk roads, and so on).
This is where the stacking order of the lines begins to matter, and it may be necessary to do some careful re-ordering to achieve the desired effect. Depending on the way in which roads were drawn, it may also be necessary to split some of the lines when colouring roads.
At this point, it is also possible to start adding other features such as railways, bridges, stations, key buildings, road numbers, names and destinations. It is a good idea to make use of ArtWorks’ ability to use layers here, so as to keep the various pieces of the drawing apart.